Showing posts with label Fabrication. Show all posts

Sunday, October 11, 2009

Diff mount & fuel lines

I know its been a while since the last update but there has not been really anything new to report.
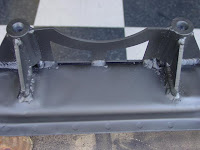
I fixed my issue with the rear differential mounting bracket. I cut the rear support gussets, mounted the differential to the bracket after some slight persuasion to the bracket, and brought the entire assembly to the welder and had it welded in place. Painted it, done.




Fuel system:
Next up was the upgrade of the fuel lines and pump. The stock Miata fuel pump and lines are not adequate for the bigger V8 engine so both need to be replaced. For the fuel pump this means removing the in tank assembly, thankfully Mazda provides an access panel on the rear package tray so the tank does not need to be removed to replace the pump. Simply remove the access panel, then carefully remove the fuel pump assembly unit. The stock fuel pump can then be removed. I am replacing the stock fuel pump with a Walbro 225 which will be able to supply the new engine with enough fuel. Since I am installing larger 3/8 fuel line versus the factory 5/8 line, I needed to have a way to connect the new lines to the fuel pump assembly at the tank. There are several ways this could be done but I drilled out the 5/8 hard lines and replaced them with -6 (3/8) AN bulk head fittings which will connect to -6 braided hose to a Corvette fuel filter/regulator then 3/8 hard line to the engine bay.

Here are some pictures of the process so far:

Top of gas tank with the stock fittings.


Stock fittings removed:


New pump and fittings mounted:


Assembly installed with -6 braided supply and return hoses connected:


Here is the Corvette fuel filter/regulator installed under the car (the other 2 lines are the rear brake and fuel tank vent lines) :


Next on the to do list is to run the 3/8 fuel line from the filter to the front of the car. Then I can install the rear subframe back into the car. I wanted to finish the fuel setup first before installing the rear subrame, one less thing that could be in the way.

Sunday, September 13, 2009

Small update

Not much new to update on the build. Been waiting on some parts to come in and also trying to save some cash for the next big purchases...engine and transmission.
Have been getting some things done though..

Got all of the new suspension bushings installed into the a-arms. They are ready to go.
Painted the firewall, I used Ford engine block blue, a surprisingly close match!


Also finally got the mounting bracket for the rear differential welded into place onto the rear subframe. Don't mind the screws, they were just holding the bracket in place so I could take the whole assembly to the welder.


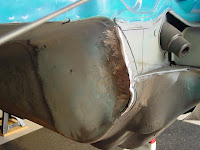
One minor problem I have had with the differential bracket mount is the bracket is flat but the location on the subframe where it attaches is curved. When the bracket was welded into place it was pulled down to the subframe. This changed the location of the bolts in relation to the differential's mounting holes, moving them off center. In this picture you can see what I mean.


Those two bolts should be centered in the mounting holes. With the bushings inserted, the bolts will not thread into the bracket. I'll have to figure something out for a solution but a big hammer may be involved.

Not much else to say. After fixing the differential problem, its time to start on the fuel system.

Wednesday, August 5, 2009

New parts...

Busy weekend!
Doesn't look like much but all of this small stuff is time consuming!
Applied some sound/heat insulation to the interior floor and firewall. Hopefully to keep some of the heat from the engine and exhaust under control, not really concerned about making it quiet!


Also finally got some new suspension parts and started to install them...woo-hoo! New ball joints, tie rod ends, end links, and a set of polyurethane bushings for the front and rear control arms.


You can see here the state of the high mileage suspension versus new and why I went ahead and replaced them while it was apart! This is a picture of the front upper ball joint. Unlike the lower ball joints, the uppers are part of the upper control arm (Mazda built it that way for some reason) so you must replace the whole A-arm as one unit. The upper ball joints were not too loose but the boots were torn and worn out. Replacement rubber boots are available from Mazda so I just replaced them with new boots. Simply popped the old ones off with a tap from a hammer and chisel and pressed the new ones on using a 1 1/8 " socket.


Next is to start installing the new bushings. That will be the job for this weekend.

Sunday, July 19, 2009

Finishing the firewall mods....

Got the widening of the transmission tunnel all done. Not too difficult but it was a lot of work. I'm sure it would be faster a second time. A cut is made where the firewall meets the transmission tunnel and then the tunnel is widened to about 18 inches in the center to clear the T56 bellhousing. This is needed since the engine is placed further back using the V8 Roadsters kit for better weight distribution. Other kits do not require this modification but I wanted to optimize handling.
Now here are some pictures of the process. And a big thanks to my neighbor Jeff for welding up the cuts for me!

Original transmission tunnel (with corner tabs cut):


Cuts to the driver and passenger sides:


After some "massaging" with a hammer and some heat.
Note the firewall has been folded over in these pics. It could have been cut as well:


My neighbor welding the seams for me:


All done, welded, grinded and sealed!


Now it just needs a little clean up and some paint.

One thing I would do differently is cut the support gussets on the inside of the car first.
There are 2 gussets inside the car that reinforce the transmission tunnel to the firewall and they are not easy to move. If they were cut combined with the cuts of the tunnel, it would have been much easier to widen the tunnel. Obviously they would need to be welded back into place but its just a couple of more steps. Eh, live and learn!

Saturday, July 11, 2009

Frame Stiffeners Installed


Installed the frame stiffeners today. These are bolted in place over the floor rails under the car and help reinforce the unibody as well as provide mounting points for the transmission.

Also started prepping the rear subframe for welding the differential mounting bracket. Just sanded off the paint where the bracket will be welded and placed it in the proper position for a 3.5 degree pinion angle. I'll have a local welder do the job.

Not much else to report. It is nice to actually put parts ON the car instead of removing them though!

Saturday, June 27, 2009

Started firewall mods...

Cut out the "tabs" of the firewall today. These are located on both sides where the frame rails meet the firewall. They must be cut out for clearance of the new engine and transmission.

I still need to widen the transmission tunnel where it meets the firewall. I'm waiting before doing this as once the cuts have been made and the tunnel widened, the firewall and tunnel will need to be welded back together, a job for a experienced welder.

Here are a couple of pictures of the cut tabs:

Driver side tab


Passenger side tab